Chocolate-Caramel Hazelnut Tart
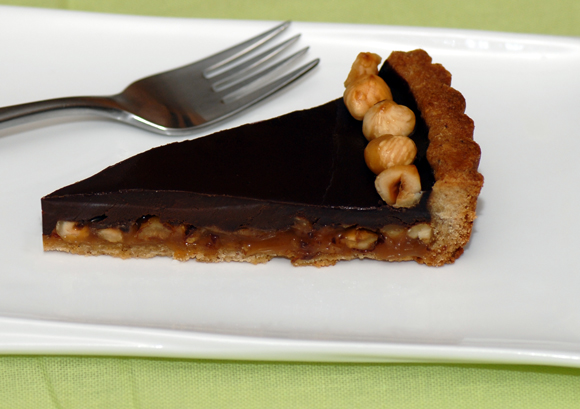
This is a showstopper of a dessert: a crisp nutty tart shell, a soft, rich layer of caramel studded with crunchy hazelnuts, topped with a dark chocolate layer that lies somewhere between a flourless chocolate cake and a ganache, garnished with sparkly caramelized hazelnuts. It’s a sophisticated balancing act between sweet, bitter, and salty flavors. It’s also quite rich; a thin slice is usually plenty unless you are blessed with an insatiable sweet tooth.
— One 9-inch tart, approx 16 servings
*Items marked in green are available from The Gourmet Corner.
Hazelnut Crust
- 1 large egg, separated
- 3/4 cup roasted hazelnut flour
- 1/2 cup confectioner’s sugar
- 1 cup unbleached all-purpose flour
- 5 Tbs cold butter, thinly sliced
Caramel-Hazelnut Filling
- 14-oz can sweetened condensed
- 2 Tbs butter
- 1 cup skinless roasted hazelnuts, coarsely chopped
- 2 tsp vanilla extract
Chocolate Filling
- 2 large egg yolks
- 1/2 cup cream
- 1/3 cup milk
- 5 oz Cacao Noel Noir 72 % chocolate calets
- 2 Tbs Échiré unsalted butter
Garnish
- 1/3 cup skinless roasted hazelnuts (if you want to be all ‘Martha’ about it, try to use all the same size nuts)
- 1/2 cup sugar
- pinch cream of tartar
Prepare the Crust
Beat egg in a small bowl until well-mixed. Combine hazelnut flour, confectioner’s sugar, and unbleached flour in food processor fitted with a steel blade. Process until well-mixed (about 15 seconds).
Scatter butter pieces over flour mixture, process to cut butter into dry ingredients until it looks like coarse meal, about 30 seconds.
With food processor running, slowly add egg mixture and process until the dough forms a ball, about 20 seconds. Transfer dough onto a sheet of plastic wrap (or into a plastic bag) and shape into a 6″ disk. Refrigerate until firm but malleable, about 30 minutes.
Roll out dough on a lightly floured surface to a 11″ circle (work lightly but quickly: if the dough gets too warm it becomes difficult to work with). Gently roll the dough up around the rolling pin and use the rolling pin to transfer it into a non-stick 9″ tart pan with removable bottom (if the pan isn’t non-stick, spray it with cooking spray). Gently ease the dough into the pan, lifting and settling it until it lines the bottom and sides of the pan smoothly. If it tears, don’t worry — simpley patch the torn bits together with a small bit of dough. Fold the excess dough at the edges back into the pan. Working around the edge of the pan, press the folded dough against the side of the pan with one index finger while pressing the top of the same bit of dough down with your other index finger, making a neat, smooth ring of dough around the sides of the pan.
Put the tart pan on a baking sheet and chill in the refrigerator for 30 minutes to firm the dough.
Heat the oven to 375F. Remove the tart pan from the refrigerator, press a sheet of aluminum foil into it, then fill with pie weights or dry rice. Bake until very lightly browned, about 30 minutes, rotating the pan halfway through the baking time.
Remove from oven and remove foil and weights from tart shell. Cool to room temperature.
Prepare the Caramel-Hazelnut Filling
In a heavy-bottomed saucepan over medium-low heat, combine the condensed milk and 2 tablespoons of butter. Slowly bring the mixture to a boil, stirring continuously. Continue stirring over the heat until mixture becomes thick and amber in color, about 15 minutes.
Add the vanilla to the caramel and stir until incorporated. Add the cup of chopped hazelnuts to the caramel and spread evenly over the crust using an offset spatula or the back of a spoon. Refrigerate tart shell until caramel is firm, about 30 minutes.
Prepare the Chocolate Filling
Bring oven to 300F.
Whisk yolks with a couple tablespoons of the cream (exact amount doesn’t matter). In a microwave-safe bowl, combine remaining cream, milk, and chocolate calets. Microwave on medium-low power until liquid is hot and chocolate is beginning to melt (about 1.5 – 2 minutes). Stir gently until chocolate is completely melted (avoid introducing bubbles to the mixture), microwaving a little more if necessary. When chocolate is completely melted, stir in the yolk mixture.
Remove the tart from the refrigerator, but keep it on the baking tray. Pour the chocolate mixture over the caramel filling in the tart shell, tilting the pan if needed to get it to cover the entire surface of the pan evenly.
Place tart, still on baking tray, in the oven. Bake until tiny bubbles are visible on the surface and chocolate layer is just set, about 25 minutes (note: if pan is shaken, chocolate will appear wobbly because of the hot caramel under it).
Cool tart in pan on a wire rack 30 minutes. Refrigerate until filling is firm, at least 3 hours up to 24 hours.
Prepare the Caramelized Hazelnut Garnish
Note: this is best done shortly before serving, so that the caramel stays hard. If prepared more than a few hours in advance, the caramelized hazelnuts will still be delicious, but slightly sticky.
Lightly oil a baking tray with sides (the sides keep the nuts from rolling off). Put a couple of forks beside the tray.
In a small, heavy-bottomed saucepan, melt the sugar with the cream of tartar over low heat (alternate method: add 2 Tbs water to the sugar, bring to a boil, then turn heat to low) cook sugar until it is golden amber, stirring gently so that it doesn’t burn. As soon as the caramel is golden-brown, throw in the hazelnuts and roll them around in the pan to coat them evenly. Immediately dump the nuts out onto the oiled tray, then quickly use the forks to separate the individual nuts. Allow to cool completely. Store in an air-tight container until needed.
Garnishing the Tart
Remove the sides from the tart pan and slide the tart off the bottom of the pan onto a flat serving platter (it may be helpful to gently slide the blade of an offset spatula between the bottom crust and the pan bottom to loosen them).
Just before serving the tart, arrange the caramelized hazelnuts in a neat circle around the outer edge of the filling. As you arrange them, press each nut gently into the filling to prevent it from rolling when the tart is moved.
